Git Fundamentals

Welcome to Git Fundamentals. This reference guide is meant to serve as a basic instructional document on what Git is and how to use some of it's basic features.

Goals of this guide: By the end of this document,you should have a good understanding of how to create a repository, configure Git, use basic commands, and to create and manage repositories and branches. This document will not cover workflows (based on personal experience, every individual and company uses Git in a slightly different manner). Finally, this document will list a series of links for further reading on all these topics and more.

This document assumes you have already downloaded and installed Git on your machine. If you have not done this yet, please visit Git's Download page.

Written by Brian Immel.

What is Git?

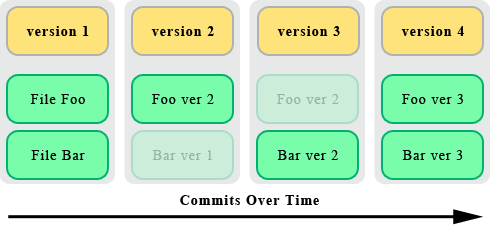
Git is a version control system (VCS) that is data centric. While other VCSs (Subversion, CVS, and so on) keep information as a set of files and changes made over time, Git thinks of the data as snapshots of a small filesystem. Every commit in Git is snapshot what was changed and just stores those individual changes instead of making a snapshot of every file.

Using Git may seem odd for those users coming from other VCSs or for newcomers but the good news it that Git has both a GUI and a command-line interface. With that being said, this reference guide will not cover the GUI. It's a good thing to know what's happening "under the hood" before taking advantage of the GUI. This reference guide will provide you with some common commands that every good Git user should know.

This reference guide is by no means comprehensive. This guide just covers some of the basics. For a complete listing of all commands and other Git features, please refer to Git's Reference Manual.

Shell Commands

In short, this reference guide won't cover any basic shell commands outside of Git's commands and assumes you have basic knowledge of Unix. Also, this guide assumes that you are using Git's Bash shell and all the content herein is written for this shell unless otherwise noted. Basic Unix commands is a good place to find a short and simple list of what's available in Unix.

Windows users: some commands may not be available or may have different names. Please refer to Basic Git Command Line Reference for Windows Users for more details.

Configure Git

One of the first things you did was set up your name and e-mail address with your repository. You should set up your name and email for the repository so you can see who committed what when working in a team environment.

git config --global user.name "<first lastname>" - set up the user name for the repository.

git config --global user.email "<youremail@yourdomain.com>" - set up the email address for the repository.

By default, Git uses whatever you’ve set as your default text editor or else falls back to the Vi editor to create and edit your commit and tag messages. To change that default to something else, you can modify the core.editor setting:

git config --global core.editor "<editor>"

Create a Repository

A repository is essentially a project. One can imagine a repository as a project's folder with all the related files inside of it. In fact, that's what it will look like on your computer anyways. You tell Git what your project is and Git will start tracking all of the changes to that folder. Files added or subtracted or even a single letter in a single file changed -- all of it's tracked and time stamped by Git. That's version control.

When you start a new project, you want to initialize your project using the git init command. This command will set up all the necessary pieces to start version controlling your files.

Basic Commit Commands

In order to use version control, you need to add and commit files (a snapshot). You can rollback versions, split, and so on but we'll get to that later.

To add a file to the repository, you use this command:

git add <file name>

Once you've made changes to a file, you'll need to commit the changes to the repository:

git commit -m '<message>'

This commit command will commit a change to the file to the project with a message that you specify. It is very important to leave a meaningful message on your commit. Other developers (and future you) can review what was committed, notes, next steps, or any other useful information that you want to communicate with this commit.

To see the status of your repository, that is, to see if you have any un-checked in files, use the status command: git status.

Repository Status

Before the end of the day or merging branches, you should check to see the status of your repository. To do this, you use the git status command. This command will give you a verbose report of which branch you're on, items not staged, and some commands to help stage those files.

git status -s - shows a status next to the file(s). What's the status characters mean?

  • ' ' = (no character) unmodified
  • M = modified; You need to commit this file.
  • A = added; File's content has been added to the repository but not committed yet.
  • D = deleted; File has been removed from repository and from the directory. To remove a file but keep it in the filesystem (directory), use the --cached flag.
  • R = renamed; File has been renamed.

If you run this status command and the it comes back empty, then there is nothing staged (waiting) and the repository is "clean".

"What does a clean repository mean to me?"

There is no file maintenance needed on your part. Take a break, have some coffee, or better yet, go home.

Diff and Log Commands

Diff command helps you compare changes to files and find out what state the files are in.

git diff - shows which files were updated and what was changed.

git diff --cached - shows which files have been updated and added but not committed.

git log - shows chronological order of all your commits.

git log <file name> - show chronological order of <file name>'s commits.

git log --pretty=oneline - displays output of chronological order of all your commits

git log -since=<number>.<years|months|weeks|days|hours|minutes> - shows chronological order of all your commits within a specific time range.

Example: git log -since=3.months - shows log files within the last 3 months.

git log --grep <term> - search through log for <term>

Removing Files

At times, it may be necessary to remove files from your repository. Using the git rm is the command used to remove files but it may be better to use various flags if you want to remove it from the repository, directory, or both.

git rm -f <file name> - force removes <file name> from repository and directory. This flag is handy as it prevents you from removing changed files that have not been committed yet. Be careful using this command with this flag as it will remove your file from disk as well.

git rm --cached <file name> - removes <file name> from repository (just removes from Git and keeps it on disk). Side note: if you decide to add the file back into Git and you didn't change the name of the file, the history (log) will still be intact.

git mv - moves or renames a file. Works the same as the Unix command but file must first be added to Git.

Stash Command

Git stash is used when you need to leave some code in a messy state to switch to another branch or project. Stash takes the dirty state of your working directory and saves the unfinished changes so you can re-apply later.

git stash list - lists all stored stashes.

git stash apply - takes the stashed files out of the WIP (Work In Progress) status and puts them back into the "working state".

git stash drop - drops (removes) the current WIP files and allows you start from scratch (in the repository).

Don't stash individual files. Stashing individuals files will make it difficult to pull them out the dirty state.

How to Create Branches

Git repositories use branches to isolate work when needed. It is a common practice when working on a project or with others to create a branch to keep your changes in until they are ready. This way you can work in other branch(es) while the 'master' branch stays stable. When your branch is ready, you merge it back into master.

Branching means you diverge from the main line of development and continue to do work without messing with that main line. In many VCS tools, this is a somewhat expensive process, often requiring you to create a new copy of your source code directory which can take a long time and excessive amounts of disk space for large projects.

Brian@HOST /p/web/ (dev)
$ git branch
* dev
master

git branch - tells you where you are in the branch tree. The * and green colored name indicates which branch you're in. Plus, the prompt tells you where you are as well.

git branch <branch> - creates a new branch called <branch>.

git checkout <branch> - switches to <branch> branch.

git checkout master - switches to master branch. Technically, this is the same command as the preceding one. Every repository starts out with a branch called master. If you try to create another branch called master, you will get an error message stating that that branch already exists.

git checkout -b <branch> - create and switch into the new branch using one command.

git branch -d <branch> - removes a branch called <branch>.

You cannot delete a branch that you're in. You must move out (cd) of that directory and then delete the target branch.

As mentioned before, never work in the master branch. If anything, the master branch is your published or "final" version of your code. You should initialize your files on the master branch and then create and work in a separate development branch.

For a great visualization on how branches work in a project, see this GitHub Guide guides.github.com/overviews/flow. and Atlassian's wonderful documents on Git branching methodologies called Comparing Workflows and Git Workflows.
Merge Command

Git merge allows you to join two or more development branches, or histories, together. Merging integrates changes from the named commits (since the time their histories diverged from the current branch) into the current branch. This command is used by git pull to incorporate changes from another repository and can be used by hand to merge changes from one branch into another.

git merge <source> - merges <source> branch into current branch.

"When would I use this?"

When you code is ready to be published, you would merge your development or other branch into the master branch.